EASY PROJECT: Build This Dual Speaker Tweed Guitar Amplifier
When we came out with our Cigar Box Amplifier Kit, we never expected to see so many radical designs, such as this dual-speaker tweed amp.
This is an easy project with only minimal soldering skill needed. To make this, you'll need a basic soldering iron, a spool of solder, and a pair of wire strippers.
This battery-driven guitar amp can be assembled in just a few hours.
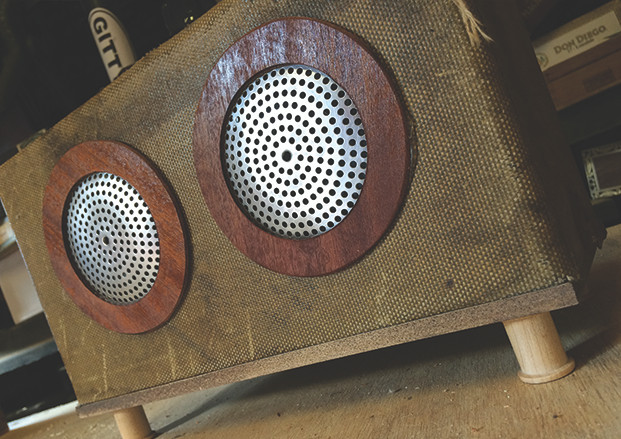
Housed in the top half of a vintage 1950’s film projector case, it’s 2.5 watts of solid-state fury. And it’s loud enough for busking, living rooms and does great in the recording studio.
Hear the Demo
Let’s start with the demo video. In it, I've plugged-in with the FrankenTulip guitar, which is loaded with a C. B. Gitty P90 Soap Bar pickup in the neck position.
Anyone with the most basic soldering and woodworking skills can build one of these DIY amplifiers.
The engine behind this amp is a simple 2.5-watt cigar box amplifier kit ($37 at CBGitty.com) along with an optional second 3-inch speaker ($7 also at CBGitty.com).
Note: definitely opt for the second speaker. It increases the volume output significantly.

We’re going to skip the cigar box for the amp housing that the kit recommends and use a much bigger tweed case from an old projector.
Parts Needed
- An antique tweed-covered projector case. Old cases for 45 rpm record cases work, too.
- C. B. Gitty Cigar Box Amp Kit
- Extra 3” speaker
- Optional: Two (2) drain covers (I found 3 3/8” drain covers at a home improvement store for $4 each)
- Optional: Four (4) sewing spools to use as feet
- Optional: Thin plywood to make speaker grill trim circles.

Step 1
Go Junkin’
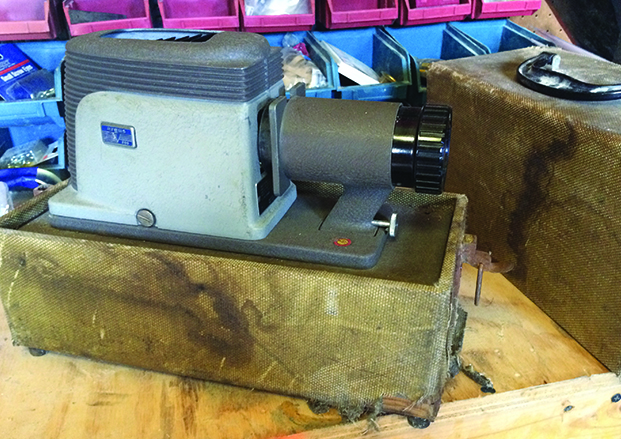
Go junk pickin' at flea markets or thrift stores to find an old projector case! I found this projector at a thrift store for $5.
I chose it for its beat-to-hell tweed cover that had years of tears, stains, and grime, giving it the appearance of a 1950’s Fender tweed amp.
Remove the projector from the case, saving the projector for your next Warhol/Velvet Underground-inspired show.

Step 2
Prep the Amplifier.
Note: Don’t solder the speakers yet.
This is a very basic kit that will only require a standard Radio Shack soldering iron, some wire cutter/strippers, and some solder.
The directions are idiot-proof and require only a few simple solder joints.

Step 3
Mod the Kit
We’re going to mod the kit slightly by wiring two speakers in parallel to the amp board.
This simply means we’re first going to run two wires from each speaker (using the extra wire provided in the kit).
Then we solder the black leads to the black wires of the amp board, and the red leads to the red wires.
I did a quick mock-up photo above.
Make sure you cover your solder joints with heat shrink tubing or electrical tape to insulate them.
Viola! We just increased the output of the amp by adding an extra speaker.
Step 4
Cut the Speaker Holes
Cut out the speaker holes in the tweed projector case.
After planning out the look of the amp, I used a compass and drew two 3-inch circles on the case and cut them out using a simple handheld coping saw.
Make sure the holes are no more than 3-inch in diameter, or the speakers won’t mount correctly.
Notice that I used only the top half of the case for this project.
I saved the bottom half for another tweed amp project in the future.
I created a new bottom for the amp by cutting a thin piece of poplar to fit.

Step 5
Drill & Install
Drill holes for speaker mounting bolts, volume knob, output jack and LED light and install everything.
Note: Although the speaker covers will be top-mounted, the speakers themselves are rear- mounted.
All the wiring details are covered in the kit directions.
I decided to put the knobs on the top of the amp, giving it a 1950’s vintage look.
I also had a cool mini-control panel in my box of junk that I repurposed for volume/output.

Step 6
Check Your Battery
If you decide your tweed case will be permanently closed, make sure to mount the battery compartment on the outside of the housing.
I knew I’d be gluing my amp housing shut, so I drilled a hole in the back of the amp and fed the 9v battery terminal out.
I then mounted the battery clip (included in the kit) near that hole and can now swap out batteries easily.

Step 7
Install Speaker Covers
The amp kit comes with black wire mesh speaker covers that look great when using a cigar box as the housing and rear-mounting everything.
However, we’re dealing with tweed cover case, and the tweed rips and shreds when you cut into it.
We want to cover those up by front-mounding speaker covers.
For this, I used the sink drain covers mentioned earlier, and some wooden mounting rings that I cut from thin plywood.
I used a hot glue gun to mount the drain covers and wood rings.

Step 8
Give it Feet
Add wood sewing spools as feet.
Note: I lacquered the spools first, giving them a nice, finished appearance.
Step 9
Crank it Up!
Get a 9v battery and crank it up!
These kits have a lot of modding possibilities such as adding an output jack to drive a speaker cabinet.
They’re also a lot of fun for amateur tinkerers like myself.
I also recommend them to anyone who wants to teach their kids basic electronics.
Bonus: Gain Control
Each amp circuit has a tiny gain control with a screw mounted to it.
You can set your gain from pristine-clean to Hound Dog Taylor dirty.
If you opt for dirty-gain (which I did in the video above), just remember you can always dial back the volume knob on the amp to clean things up.
Conclusion
As you can see, this is an easy project with only minimal soldering skill needed.
All you really need is:
- a C. B. Gitty parts-only amplifier kit
- an extra speaker
- a soldering iron
- some solder wire
- and a box to put it all into
Once you build your own amplifier, send us some photos (and a video, if you like) through this link so we can feature your work on our website!
Like what you've read here?
Make sure to subscribe to the C. B. Gitty Crafter Supply newsletter!
Once a week you'll receive helpful tips like this, along with breaking news, first-looks at new products and sales, and inspiring content to build and play cigar box guitars.
Recent Posts
-
2024 World's Wildest Electric Cigar Box Guitar Build-Off Winners!!!
C. B. Gitty Crafter Supply is proud to announce the winners of the 2024 "World's Wildest Electric Ci …31st Oct 2024 -
Improved C. B. Gitty: Easier Than Ever! (Work in Progress)
Ben “Gitty” has been cleaning house, making our website even easier find your favorite parts, kits a …7th Oct 2024 -
Build-Off Contest 2024: The World's Wildest ELECTRIC Cigar Box Guitar
CBGitty.com is looking for the WILDEST, LOUDEST & MOST DIABOLICAL electric cigar box guitar ever …6th Sep 2024


